Advanced Group Policy Management (AGPM) with High Availability Set-up Guide
Terminology:
AGPM: Microsoft
Advanced Group Policy Management (AGPM) is a client/server application. The
AGPM Server stores Group Policy Objects (GPOs) offline in the archive that AGPM
creates on the server's file system. Group Policy administrators use the AGPM
snap-in for the Group Policy Management Console (GPMC) to work with GPOs on the
server that hosts the archive. Understanding the parts of AGPM and related items,
how they store GPOs in the file system, and how permissions control the actions
available to each user role can improve Group Policy administrators'
effectiveness with AGPM.
AGPM Client: A computer that
runs the AGPM snap-in for the Group Policy Management Console (GPMC) and from
which Group Policy administrators manage GPOs.
AGPM snap-in: The software component of AGPM installed on
AGPM Clients so that they can manage GPOs.
AGPM Server: A server
that runs the AGPM Service and manages an archive. Each AGPM Server can manage
only one archive, but one AGPM Server can manage archive data for multiple
domains in one archive. An archive can be hosted on a computer other than an
AGPM Server.
AGPM Service: The
software component of AGPM that runs on an AGPM Server as a service. The
service manages GPOs in the archive and in the production environment in that
forest.
Archive: In AGPM,
a central store that contains the controlled GPOs that the associated AGPM
Server manages, in addition to the history for each of those GPOs. This
includes all previous controlled versions of each GPO. An archive consists of
an archive index file and associated archive data that may include data for
GPOs in multiple domains. An archive can be hosted on a computer other than an
AGPM Server.
Controlled GPO: A GPO
that is being managed by AGPM. AGPM manages the history and permissions of
controlled GPOs, which it stores in the archive.
Uncontrolled GPO: A GPO in
the production environment for a domain and not managed by AGPM.
Reference:
https://docs.microsoft.com/en-us/microsoft-desktop-optimization-pack/agpm/technical-overview-of-agpm
Resources needed:
WS2016-Test
Ø Domain Controller, AGPM Server, AGPM
Client, DFS role
Ø OS - Windows Server 2016 datacenter
2016SERVER1
Ø Domain member
server, AGPM Server, AGPM Client, DFS Role
Ø OS – Windows
Server 2016 datacenter
Installer:
AGPM Server - agpm_403_server_amd64.exe
AGPM Client – agpm_403_client_amd64.exe
Flow
diagram

In this
configuration, Domain controller is also AGPM server. Which means DC also holds
Archive/Offline aside from Production. Archive is Sync using DFSR.
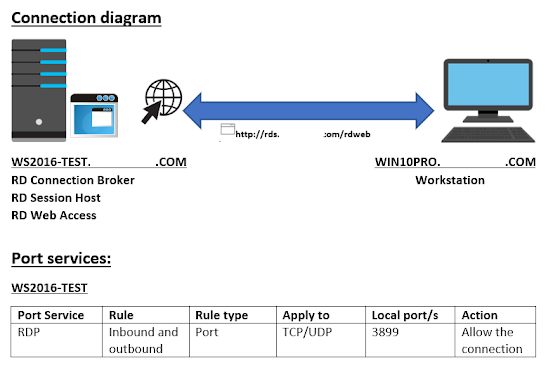
Actual
diagram

WS2016-TEST : Secondary connections of AGPM client to AGPM server
Port
service:
Port number 4600 which is
automatically open when you install AGPM client or Server
1.
Install DFS
Role and .Net Framework 3.5 on both Server (WS2016-TEST & 2016SERVER1)
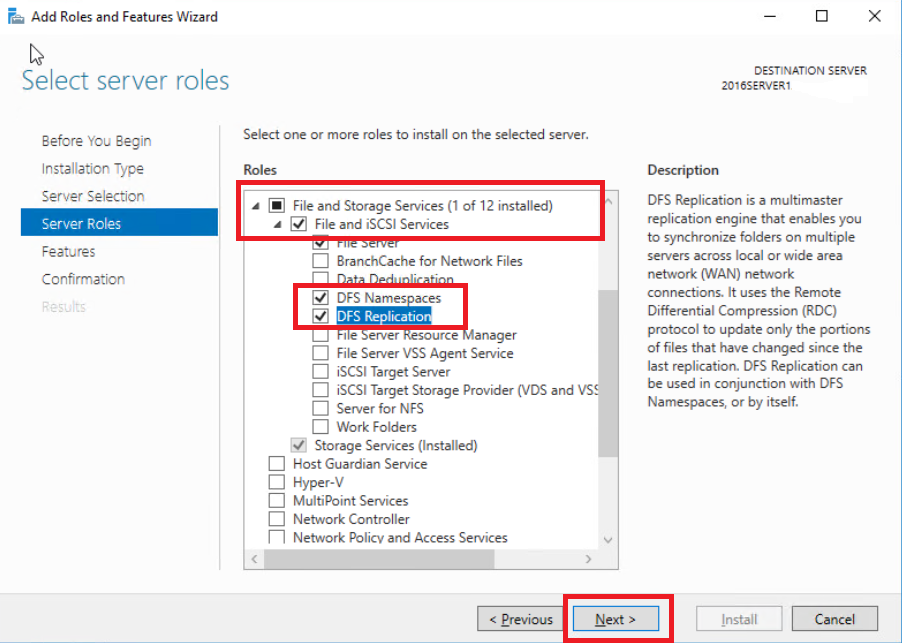
On 2016SERVER1 Server Manager, click Add
roles and features, On Before you begin click Next,
On Select Installation type, ensure that Role-based or feature-based
installation is selected then click next. On Server selection click next. On
Select server roles, expand File and Storage services. Expand File and iSCSI
services. Click DFS namespace then click add features. Click DFS Replication
then Next.
On Select features, click .Net Framework 3.5 Features then Next.

2.
Configure DFS
Namespace and Replication
On 2016SERVER1 Server manager, Click
Tools then click DFS Management.

On DFS Management, click Namespaces on the left pane then click New Namespace… on the actions pane.

On Namespace Server, Type 2016SERVER1 on server then click Next.
On Namespace Name and Settings, click AGPMDB on name then click Next.
On Namespace Type, ensure that Domain-based namespace is selected then click Next.
On Review Settings and Create Namespace, click Create.
On Confirmation, you will see the Success status. click close.
On DFS Management, click \\<domain>.com\AGPMDB below Namespaces then click New Folder on the actions pane.

On New Folder, Type AGPMArchive on name, Click Add button then Type \\2016SERVER1\AGPMArchive on path to folder target. Then click Ok.

On warning, Click Yes
to Create AGPMArchive folder.
On Create share, Local path of shared folder type C:\AGPMDB\AGPMArchive then
click Administrators have full access: other users have read-only permissions
then click Ok.

On warning, Click Yes to Create c:\AGPMDB\AGPMArchive folder.
On New Folder, click Ok.
On DFS Management, click AGPMArchive on the middle pane then click add folder target on the right pane.

On Path to folder target, type \\WS2016-TEST1\AGPMArchive then click Ok.
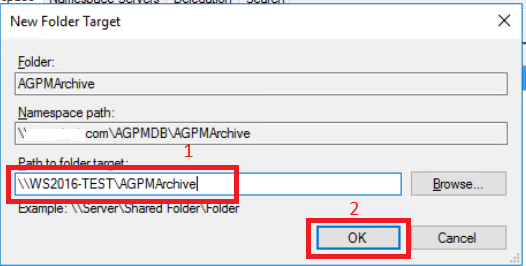
On Warning, Click yes
to create \\WS2016-TEST\AGPMArchive
On Create Share, Local path of shared folder type C:\AGPMDB\AGPMArchive, Click
Administrators have full access: other users have read-only permissions then
click Ok.

On warning, Click Yes to Create c:\AGPMDB\AGPMArchive folder.
On Replication, click Yes to create a replication group.
On Replication Group and Replication Folder Name, click Next.
On the Replication Eligibility click Next.
On the Primary member, select 2016SERVER1 then click next
On the Topology Selection choose No Topology then click Next.
On Warning click Ok.
On Review Settings and Create Replication Group, click Create.
On Confirmation you will see Success Status. Click close.

On the replication delay click Ok.
On DFS Management, expand replication on the left pane.Click <domain>\agpmdb\agpmarchive then on the right pane, click New Topology.

On Topology Selection click Full Mesh then click next.
On Replication Group Schedule Bandwidth click Next.
On Review Settings and create Topology Click Create.
On Confirmation, click Close.
On Replication delay, click Ok.
2. Create User account that will be used for service account
a. On WS2016-TEST1 Server Manager, click Tools then click Active Directory Users and Computers.
b. Click caspotest.com then Right click and click New, User.
c. On the New-Object-User, On First name and User Logon Name type AGPMAdmin then click Next.
d. On Password and Confirm Password type<password>, uncheck user must change password at next logon, check user cannot change password and password never expires then click Next.
e. Click Finish.
f. Double click AGPMAdmin, click member of tab then click Add.
g. On select groups, Type Domain admins then click Ok 2 times.
3.
Install AGPM SERVER
on Both Server (2016SERVER1 & WS2016-TEST)
On 2016SERVER1, run agpm_403_server_amd64.exe

a. On Welcome page, click Next.
b. On Microsoft Software License Terms, click I accept the license terms then click Next.
c. On the Application path, click Next.
d. On the Archive Path Type C:\AGPMDB\AGPMArchive\ then click Next.
e. On AGPM Service Account type <domain>\agpmadmin on user account then type <password> on Password and Confirm Password. Click Next.
f. On Archive Owner Type administrator then click Next.
g. On Port configuration click Next.
h. On Languages, uncheck all except ENGLISH then click Next.
i. On Ready to Install, click install.
j. Click Finish.
k. Repeat steps on WS2016-TEST.
2. Install AGPM CLIENT on Both Server (2016SERVER1 & WS2016-TEST)
On 2016SERVER1, run agpm_403_client_amd64.exe

a. On Welcome page, click Next.
b. On Microsoft Software License Terms, click I accept the license terms then click Next.
c. On the Application path, click Next.
d. On the Archive Path Type C:\AGPMDB\AGPMArchive\ then click Next.
On AGPM Server, Type 2016SERVER1.<domain>. on DNS name or IP address then click Next.

a. On Languages, uncheck all except ENGLISH then click Next
b. On Ready to Install, click install.
c. Click Finish.
d. Repeat steps on WS2016-TEST.
2. Configuring Connection of AGPM CLIENT on AGPM Server
a. On WS2016-TEST, Navigate to C:\Windows\PolicyDefinitions Folder.
Copy AGPM.admx then paste it to c:\Windows\SYSVOL\sysvol\<domain>\Policies\PolicyDefinitions

a. Navigate to C:\Windows\PolicyDefinitions\en-us folder
Copy Agpm.adml then paste it to c:\Windows\SYSVOL\sysvol\<domain>\Policies\PolicyDefinitions\en-US

on server manager upper right, click Tools then click Group Policy Management

On Group Policy Management under caspotest.com domain, Right click IT OU then click Create a GPO in this domain, and link it here ..

On new GPO, type AGPM connection on name then click Ok.

Right click AGPM Connection GPO then click Edit.
Under User Configuration, expand Policies,
Administrative Templates, Windows Components, click AGPM then on the right
pane, double Click AGPM: Specify default AGPM Server (all domains)

Click Enabled then click Show…
On Show Contents, Type:
|
Value Name |
Value |
|
2016SERVER1. |
2016SERVER1.<domain name>:4600 |
|
WS2016-TEST. |
WS2016-TEST.<domain name>:4600 |
Then click Ok.

To close click Ok.
2. Configure e-mail notification and delegate access
a. On 2016SERVER1, on server manager, click tools then click Group Policy Management.
b. Expand Forest:<domain>, Domains, <domain> then click Change control.
Click Domain delegation Tab. In the From e-mail address box, type Administrator for which notification will be sent.
in the To e-mail address box, Type Vince@<domain>.com
(this is the e-mail address for a user account to which you intend to assign
the Approver or Full control role)
in the SMTP server box, Type WS2016-TEST.<domain>.
In the Username and password boxes, Type Administrator with a password of
<password> respectively, to access the SMTP service and make sure you confirm the
password.
Click Apply button.

Note: The e-mail setup is just for demonstration purposes. There is no mail server configured in the test environment.
On the Domain delegation Tab, click Add on the lower pane.
In Select User, Computer or Group, type Vince on the Enter the object name to select then click Check Names. Then click Ok

On the Role, select Approver then click Ok.
Add Erika with Editor Role.

Sign out on 2016SERVER1.
2. Create a GPO with the AGPM
a. Logon to the 2016SERVER1 as ERIKA with a password of <password>.
b. Open the Server Manager, then on the menu, click Tools, Group Policy.
c. Expand Forest: <domain>, Domains, <domain>, and then select the Change Control node.
Right click Change Control and then select New Controlled GPO.

In the Submit New Controlled GPO Request dialog box, Type Sales Policies in the GPO Name box, and Then click submit. (You will see a failure of the e-mail request. There is no e-mail server in the test environment, so this is expected.)

When the AGPM progress is complete, click close.
Click Pending Tab to display the new GPO.

1. Approve the
Pending Request
a. Switch to <domain>\vince
with password of <password>. (2016SERVER1)
b. Open the Server
Manager, then on the menu, click Tools, Group Policy.
c.
Expand Forest:<domain>, Domains, <domain>, and
then select the Change Control node.
d. Click the
Pending tab to display the pending GPOs.
e. Right click Sales Policies and then click Approve. (If you don’t see the pending policy, right click change control and select refresh.)

f. Click Yes to
confirm approval and move the GPO to the controlled tab.
g. Click close
when progress is complete.
2.
Shutdown
2016SERVER1 (primary AGPM server) to use Fault tolerant on WS2016-TEST
a. Shutdown
2016SERVER1
b. Logon as <domain>\administrator
on WS2016-TEST.
c.
On Server Manager, then on the menu, click Tools, Group
Policy.
d. Expand Forest:
caspotest.com, Domains, caspotest.com, and then select the Change Control node.
You will see that you are failed to connect to AGPM Server (2016SERVER1)

This is because 2016SERVER1 is down and the AGPM client installed on WS2016-TEST is pointed to 2016SERVER1 AGPM server.
Note: AGPM Service is still running since WS2016-TEST has AGPM
Server installed. AGPM Archive is still accessible since AGPM Archive from
2016SERVER1 is replicated to WS2016-TEST using DFSR.
2.
Modify AGPM
Client installed to connect to WS2016-TEST as AGPM Server.
In WS2016-TEST, Open control panel, Programs, Programs and Feature then Right Click Microsoft Advanced Group Policy Management – client then click change.

In Welcome page, click Next then click Modify.
In AGPM Server, type WS2016-TEST.<domain> on DNS name or IP address then click next.

Click Change, then click Finish
2.
Check if AGPM
client can now connect to AGPM Server (WS2016-TEST)
a. On Server
Manager, then on the menu, click Tools, Group Policy.
b. Expand Forest:
caspotest.com, Domains, caspotest.com, and then select the Change Control node.
c. You will see that AGPM client is now connected to AGPM server (WS2016-TEST).

d. Click AGPM Server tab to verify.


Comments
Post a Comment