Windows Remote Desktop Services with High Availability Set-up Guide
Configure
Remote Desktop Services
Resources needed:
WS2016-Test
Ø Domain Controller, RD connection
broker, RD session host server, RD Web access server
Ø OS - Windows Server 2016 datacenter,
IP address – 192.168.1.50 /24
Win10pro
Ø Domain member, RDS client
Ø OS – Windows 10 Pro, IP address –
192.168.1.51 /16
1. On the target server, Allow Remote
Desktop Connection
a.
System properties>Remote tab>click allow
remote connections to this computer radio button
Click ok.
1.
Install Windows Remote Desktop Services
Role
a. In Server Manager, Click Add roles and Features
b.
Click Remote Desktop Services Installation radio
button
c.
Click Standard deployment radio button and click
Next
d.
Click session-based desktop deployment radio
button then click Next 2 times
e. On specify RD Connection Broker server, click the target server then click right arrow button then Next
g.
On specify RD Session Host servers, click the
target server then click right arrow button then Next
h.
On confirm selections, click the Restart the
destination server automatically if required checkbox (as it requires to
restart after role service is installed) then click deploy.
You will see the installation progress and the server will restart automatically.
1.
Edit RDS Deployment properties
a.
Create a folder on c drive (any location will do;
we will use this to store the exported self-sign certificate later.)
b.
On the lower left side of server Manager, click
Remote Desktop Services, On the deployment overview click task drop down button
then click Edit Deployment properties
c.
On the Configure the deployment, click
Certificates on the left side (we will skip the following: RD Gateway since we
don’t need external access, RD Licensing since this is a test phase and RD Web
access since we already configure it)
d.
Open Windows PowerShell and type these two
commands for creating self-signed certificate:
New-SelfSignedCertificate -certstorelocation c:\rdscert -dnsname
"RDP"
$pwd = ConvertTo-SecureString -String "Pa55w.rd" -Force
-AsPlainText
(c:\rdscert folder is created on the first instruction)
Then
type mmc and press enter
e.
On Console1, click File>Add/Remove Snap-in
f.
On Add or Remove Snap-in, click
Certificate>Add>computer account>Next>Finish>Ok
g.
On Console1, Expand Certificate (Local
computer), Personal, Click Certificate then right Click RDP, right click
RDP>all task>Export
h. On Welcome to the Certificate Export Wizard, click Next, click Yes, export the private key radio button then next, Next Click Password checkbox , Type Pa55w.rd on Password and Confirm Password then Next. On File to export, Type C:\rdscert\rdscert.pfx then Next, Finish.
i.
You will see that the export was successful.
Click Ok
j.
On Server Manager> Configure the deployment>Certificates
Click
RD Connection Broker – Enable Single Sign on then click Select Existing
certificate
k.
On Select Existing certificate, click Choose a
Different Certificate radio box, Type C:\rdscert\rdscert.pfx, Type Pa55w.rd on Password,
check the Allow the certificate to be added to the Trusted Root Certification
Authorities certificate store on the destination computer checkbox. Then Click
Ok
l.
Click Apply
a.
Repeat steps to:
RD Connection Broker – Publishing
RD Web Access
Then
Click Ok.
1.
Create a Collection and publishing App
a.
On Server Manager>Remote Desktop Services>
click collections, click task drop down button then click Create Session
Collection
b. On Before you begin, click next. On collection name Type Browser on the name then click next. On RD Session Host, click target server, click right arrow button then Next. On User Groups, click Next. On Specify User Profile Disk type C:\rdscert on Location of user profile disks then next. On Confirmation, click Create.
c.
Once Succeeded, Click Close
d.
On Collections, click Browser
On Remote APP programs, click Publish Remote App Programs
e.
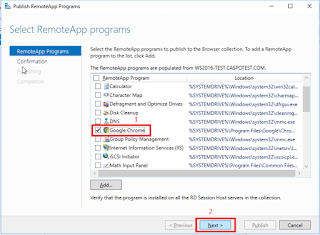
On Select RemoteApp Programs, select the Google
Chrome checkbox then next.
f.
Click Publish, then close.
1.
Create DNS record (RD web access)
a.
In Server Manager, click tools then click DNS
b.
In DNS Manager, expand server, forward Lookup
zone and click caspotest.com
Right click caspotest.com then click New Host (A or AAAA
c.
On New Host, type the following and then click
add host
Name (uses parent domain name if blank): rds
Ip address: 172.30.196.50
d.
On message box (DNS) click Ok then click Done.
2.
Test RDS deployed app
a.
Login as domain user on client
machine\workstation
b.
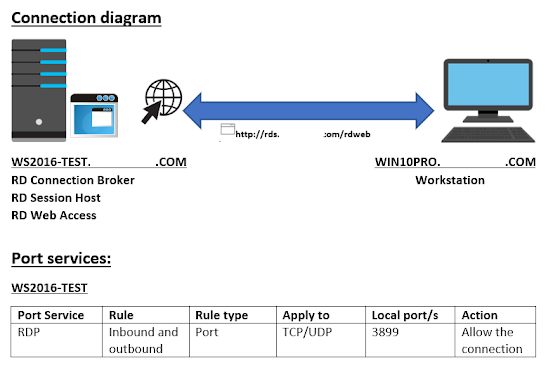
Open browser and type this url: http://rds.test.com/rdweb and
press enter
c.
On browser click Continue to this Webpage (not
recommended) -This is due to self-signed certificate of server
d.
On Work Resources, provide credentials (must be
domain user) then click sign in
e.
Verify that the published app is available.
Configure
High Availability
Resources needed:
WS2016-Test
Ø Domain Controller, RD connection
broker, RD session host server, RD Web access server
Ø OS - Windows Server 2016 datacenter,
IP address – 172.30.196.50 /16
2016SERVER1
Ø Member Server of Domain, RD
connection broker, RD Web Access server
Ø OS – Windows Server 2012 R2
datacenter, IP address – 172.30.196.55 /16
Win10pro
Ø Domain member, RDS client
Ø OS – Windows 10 Pro, IP address –
172.30.196.51 /16
Ø SQL Server database
Installer:
Ø SQL Server 2017 –
SQLServer2017-SSEI-Expr.exe
Ø .Net Framework 3.5 – dontnetfx35.exe
Ø SQL Server Management Studio –
SSMS-Setup-ENU.exe
Ø SQL Server Native Client –
sqlncli.exe
Ø Microsoft ODBC SQL Driver –
msodbcsql.exe
1.
Create DNS Record of Second RD Web Access
a.
Repeat step 5 with the following details:
Name (uses parent domain name if blank):
rds
Ip address: 172.30.196.55
Note: same rds.test.com hostname
with 2 different IP
2.
Create a domain group named RDSCB (Remote
desktop services connection broker) and add two target servers on this group
a.
On Server Manager, Click tools>Active
Directory Users and Computers
c.
On New Object – Group, Type RDSCB on Group name
then click ok
d.
Double click RDSCB, Click Members Tab then click
add
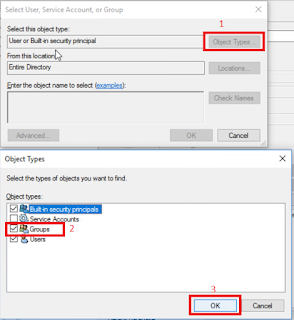
e. On Select Users, contacts, computers, Service
accounts or groups,
Click object types, click computers checkbox then Ok
1.
Install SQL Server Database on target
Node (RDS High Availability requires dedicated database) – Win10pro
(it requires internet connection)
click download and install this feature
b.
Click Close once it is done.
Click Custom, accept default media location path then click install (it requires internet connection)
It will take a few minutes.
d. On SQL Server Installation Center, Click New SQL Server stand-alone installation or add features to an existing installationg.
On Server Configuration, click Next. On Database
Engine Configuration, Click Next.
On Consent to Install Microsoft R Open, Click Accept then click Next.
On Consent to install Python, click Accept then click Next.
On the Complete, Click Close.
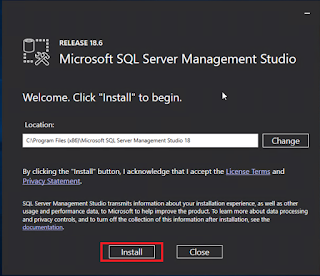
On the Microsoft SQL Server Management Studio, Click Install
It will take a few minutes.
After the installation, click Restart. (target Node will restart)
2.
Configure SQL Server Database on target
Node
Expand Security, Click and right click Login then click New Login
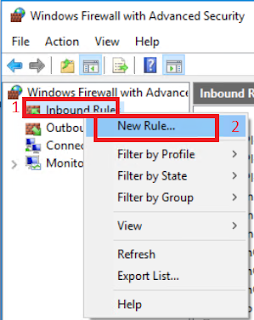
On Windows Firewall with Advanced Security, click and right click Inbound Rules, then click New rule
On Services, Run/Start the following services:
* Remote Access Auto Connection Manager
* Remote Desktop Services
* Remote Procedure Call (RPC) Locator
Click and right click Name Pipes then click Enable.
Click and right click TCP/IP then click Enable
1.
Install and Configure Microsoft SQL
Server 2012 Native Client, ODBC Driver on Remote Desktop Connection Broker
(RDCB), Firewall rule and System Services.
a.
On two Target Server Node, Run the sqlncli.exe
On License agreement, click I accept the terms in the license agreement radio button then click next.
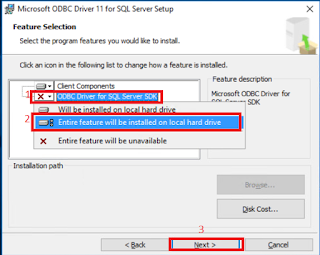
On Feature Selection, click SQL Server Native Client SDK dropdown button, click Entire Feature will be installed on the local hard drive then Next.
On License agreement, click I accept the terms in the license agreement radio button then click next.
On Feature Selection, click ODBC Driver for DQL Server SDK dropdown button, click Entire Feature will be installed on the local hard drive then Next.
On Windows Firewall with Advanced Security, click and right click Inbound Rules, then click New rule
Repeat task for TCP port 1433 (Inbound and
Outbound rule)
On Services, Run/Start the following services:
* Remote Access Auto Connection Manager
* Remote Desktop Services
* Remote Procedure Call (RPC) Locator
*Server: WIN10PRO
Then click finish.
1.
Configuring RDS High Availability
On the Deployment Overview, Right click RD Connection Broker then click Configure High Availability.
* DNS Name for the RD Connection Broker Cluster: rds.test.com
* Connection String: DRIVER=SQL Server Native Client 11.0;SERVER=win10pro.test.com;Trusted_Connection=Yes;APP=Remote Desktop Services Connection Broker;DATABASE=RDSCB
* Folder to store database files: C:\Program Files\Microsoft SQL Server\MSSQL14.MSSQLSERVER\MSSQL\DATA
Then click next.
1.
Add Second node as RD Connection broker
Server and RD Web Access Server
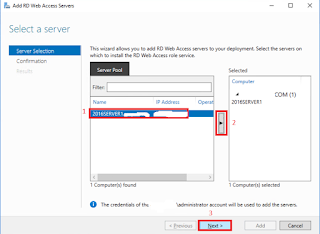
right click RD Connection Broker then click Add RD Connection Broker Server
1. Use Existing certificate for new RD Web Access Server
Type Pa55w.rd on password, Click Allow the certificate to be added to the Trusted Root Certification Authorities certificate store on the destination computers checkbox Then click Ok.















Comments
Post a Comment